
How and Why to Test Your Garden Soil for Nutrients and Texture
Soil health directly impacts plant growth, nutrient availability, and overall garden productivity. As gardeners, we often focus on the seeds we plant and the joy of the harvest. But the foundation of our garden's success lies in the soil. This is where soil testing becomes an invaluable tool for any gardener.
 Why Soil Testing Matters
Soil testing is like getting a health check-up for your garden. It provides vital information about the composition of your soil, enabling you to make informed decisions on soil amendments and overall plant care. Here are some key reasons why soil testing is crucial:
Nutrient Levels
Optimal Growth: Different plants have varying nutrient needs. A soil test reveals the levels of essential nutrients like nitrogen, phosphorus, and potassium. With this knowledge, you can tailor your soil amendments to where you’re deficient and meet your plants' requirements.
Avoid Over or Under-Fertilization: Applying too much fertilizer can lead to nutrient runoff, environmental pollution, and even harm to your plants. Conversely, under-fertilization can result in stunted growth and poor yields. Soil testing helps you strike the right balance.
pH Levels
Acidic or Alkaline: Soil pH affects nutrient availability to plants. Most crops prefer slightly acidic to neutral soil, in the 6.0 to 7.0 range. Testing your soil's pH guides you in adjusting it for optimal plant growth. Lime can raise pH in acidic soils, while sulfur or aluminum sulfate can lower pH in alkaline soils.
Soil Structure
Texture and Drainage: Soil texture, whether sandy, loamy, or clay, influences water retention and drainage. A soil texture test helps you understand your soil's texture, giving you the opportunity to amend it, select the proper plants to grow in it, and aiding in proper watering practices.
How to Perform a Soil Test for Nutrients and pH
Performing a soil test is a straightforward process that any gardener can manage. The more often you do it, the easier it becomes.
Gather Soil Samples
- Use a clean shovel or trowel to collect soil from various areas of your garden. Take samples from different depths, typically 4-6 inches.
- Avoid areas where fertilizer or compost was recently applied.
- Combine the samples in a clean container and mix thoroughly to create a composite sample.
Prepare the Sample
- Allow the soil to air dry naturally.
- Remove any rocks, roots, or debris from the sample.
Choose a Testing Method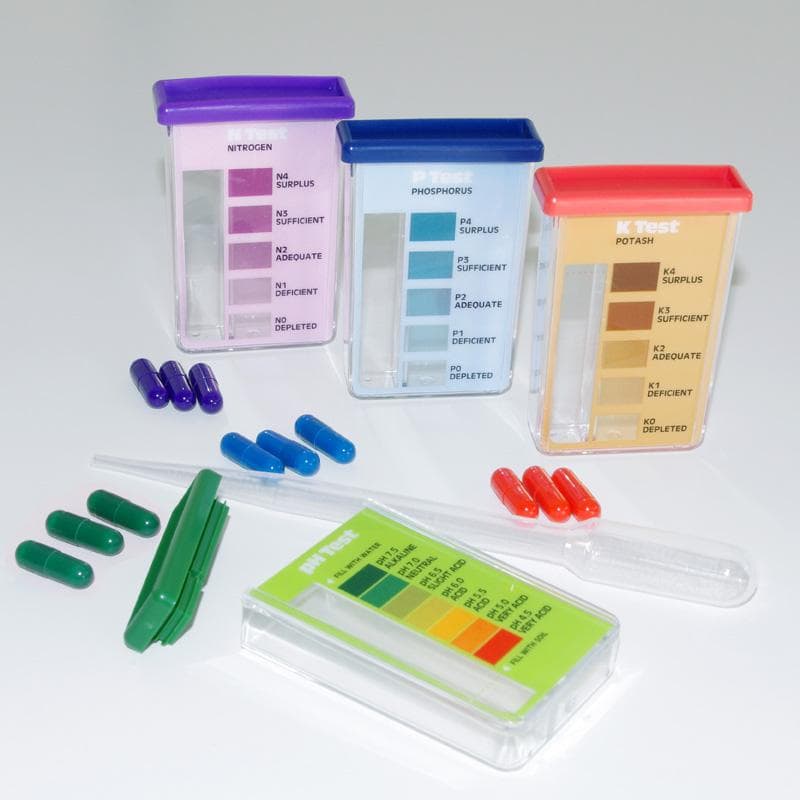
- Home Testing Kits: These kits are readily available at garden centers and provide basic information on pH and nutrient levels. This one is simple and easy to use.
- Laboratory Testing: For more detailed analysis, send your soil sample to a reputable soil testing lab. Many universities and agricultural extensions offer this service for a nominal fee.
Follow Testing Instructions
- Home Testing Kits: Simply follow the kit's instructions for mixing the soil with the provided solutions and interpreting the results. Perform each test according to the instructions – the technique may vary between nutrients and pH.
- Laboratory Testing: Each lab has specific guidelines for submitting samples. Follow their instructions for packaging and mailing.
Interpret the Results
- Once you receive the results, pay attention to key indicators such as nutrient levels, pH, and any recommendations provided.
- Labs often include suggestions for fertilizer types and amounts based on your soil's needs. Inserts for home testing kits may also include some basic suggestions.
- Consult with local extension services or gardening experts if you need help understanding the results. (Need a local expert in the Kansas City area? Contact me.)
Take Action
- Based on the results, amend your soil as needed. This might involve adding organic matter, adjusting pH with lime or sulfur, or applying specific nutrient amendments.
- Keep records of your soil tests and amendments for future reference.
I recommend testing your soil in the fall after the gardening season so you can add slow-release nutrients to fix the soil over the winter. Then, test again in the spring to see if the levels are correct. If not, this gives you the opportunity to amend again with faster release nutrients.
How to Perform a Soil Texture Test
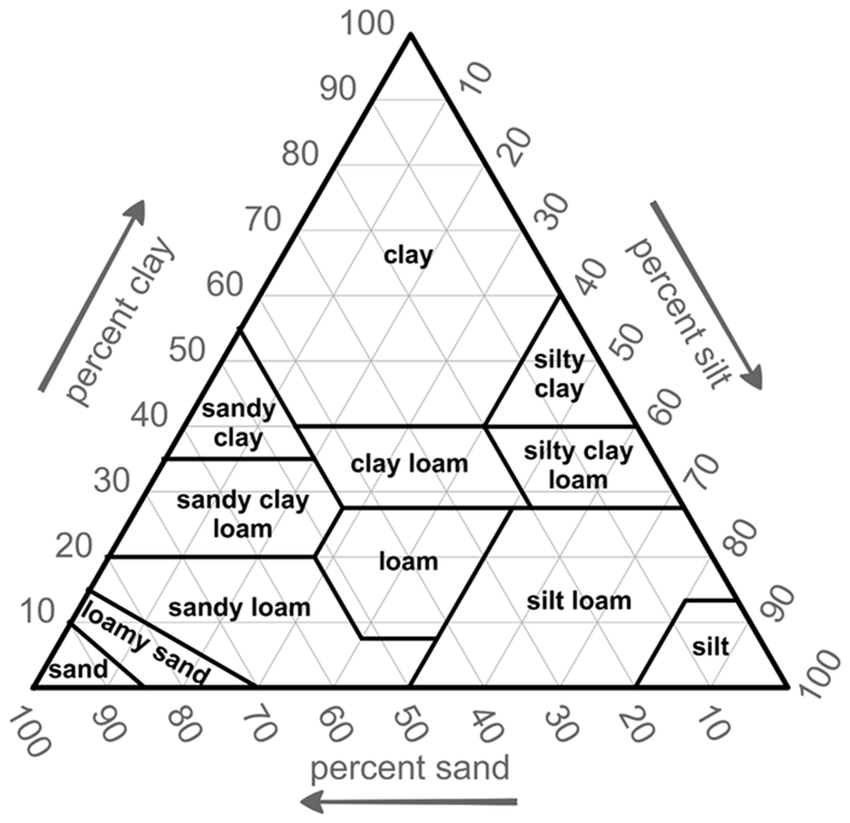
Soil texture refers to the relative proportions of sand, silt, and clay in your soil, and it greatly influences factors like drainage, water retention, and nutrient availability.
What You'll Need:
- A clear glass jar with a lid
- Soil sample (collected as described above)
- Water
- Dishwashing liquid (optional, for dispersing soil particles)
Steps to Perform the Test:
Collect a Soil Sample
Follow the same steps as preparing for a soil test: gather soil from different areas of your garden, mix, and remove debris.
Prepare the Soil Sample
Take a small amount of your soil sample and break up any clumps until it's loose and crumbly.
If your soil is quite compacted or has a lot of clumps, you can add a small amount of dishwashing liquid to help disperse the soil particles. Use only a drop or two in a small sample.
Fill the Jar
Fill the jar about one-third to one-half full with your soil sample.
Add Water
Fill the jar almost to the top with water, leaving just a little space at the top for shaking.
Add a few drops of dishwashing liquid if you haven't already done so. This helps break up the soil particles and prevents them from clumping together.
Shake Well
Secure the lid tightly on the jar and shake it vigorously for several minutes.
This action suspends the soil particles in the water, allowing them to separate based on their size and weight.
Let it Settle
After shaking, place the jar on a flat surface and allow it to sit undisturbed for at least 24 hours.
Over time, the larger, heavier particles (sand) will settle to the bottom first, followed by the smaller (silt) and the finest (clay) particles.
Once the soil has settled, you'll see distinct layers in the jar.
Sand: This layer will be the bottom layer and often the largest. It feels gritty when rubbed between your fingers.
Silt: Above the sand layer, you'll find the silt layer. It's finer than sand, feeling smooth but not sticky.
Clay: The topmost layer is clay, which is the finest and feels sticky and smooth.
Organic Matter: Floating on top of the water, you might also see organic matter like leaves or twigs.
Analyze the Layers
Measure the thickness of each layer to estimate the percentage of sand, silt, and clay in your soil.
Use a ruler or a measuring tape to determine the thickness of each layer, and calculate the percentages. For example, if sand is 1 inch thick and the total soil thickness is 3 inches, then sand makes up about 33% of the soil.
 Interpreting Results
Sandy Soil: High sand content (over 70%) means your soil is well-draining but may struggle to retain moisture and nutrients. When wet, sand remains course and breaks apart easily. Sand particles are solid and have no pockets to hold water and nutrients. As a result, sandy soil holds almost no nutrients and does not retain moisture. Sandier soils need to be watered and fed more frequently than other soils and most plants have trouble growing in this type of soil.
Silty Soil: High silt content (over 70%) results in good drainage and moderate water retention. It's rich in nutrients and retains moisture well, sometimes to the point where garden plants don't get enough oxygen. Too much silt in the soil can cause plants to wilt even when there is plenty of water, basically because they can't breathe.
Clay Soil: High clay content (over 70%) leads to poor drainage and excessive water retention. Air flow is very limited between these soil particles. When dry, the soil has a dusty, crumbly feel to it and the surface is hard and compacted, making it difficult to dig in or to till. Clay soil has a higher water holding capacity, but also less space available for organic matter and oxygen. Clay soil is high in nutrients, but plant roots may not be able to penetrate the densely packed particles to access those nutrients or the oxygen they need.
Loam: An ideal soil texture is loam, which has a balanced mix of sand, silt, and clay (approximately 40-40-20%). It’s a beautiful soil to garden in! The sand particles promote drainage and air flow, the silt particles aid in moisture retention, and the nutrient-rich clay balances out the poor water retention of the sand and the excessive moisture of the silt. Loamy soil, or something approximate to it, is the goal for the best gardening experience. We should all be so lucky.
What to Do Next:
Based on your results, you can amend your soil to improve its texture.
Improving Drainage: For clay soils, add organic matter like compost to improve aeration and drainage. Cover crops between gardening seasons can maintain drainage and add organic matter.
Enhancing Water Retention: Sandy soils benefit from adding compost or well-rotted manure to increase water retention. Cover crops between gardening season can help lock soil in place and add organic matter.
Balancing Soil: For loamy soils, maintain their structure by adding organic matter to replenish nutrients and promote healthy microbial activity.
The common denominator? Adding organic matter regularly to improve or maintain your soil is key.
Soil testing is not a one-time thing. Periodic soil tests ensure that your soil remains in optimal condition and your harvest at its peak.
Your Friend in the Garden,
