
As we start to wind down the summer gardening season it’s a great time to be adding compost to your beds to help give the soil a boost. Letting the compost break down over the winter gives it adequate time to become activated with all the little microorganisms that are so important for delivering nutrients to our plants in the soil.
But, purchasing compost, especially really good compost, can be pricey and the bigger your garden, the higher the price tag! It’s hard to justify sometimes because some of us are growing our own gardens so we can save money on our food budget, not pay more to amend the soil than it would cost us to just buy our veggies at the grocery store. And if we opt for budget compost we may find not only is the texture and quality definitely fit the price point, but our plants aren’t getting much out of that soil the following season which is a complete waste of money.
I also understand that not everybody has room for a big compost pile in their yard, you may not even have a yard and are gardening in containers on a patio or porch, but you still want the best amendments for your soil and everybody has kitchen waste that can be used to feed our garden soil.
So, today on Just Grow Something we’re going to talk about the absolute easiest and least messy ways to build a small compost pile or composting system for your garden regardless of where you are. It may not be everything you need to add to your garden, depending on the size you’re working with, but it will absolutely reduce the need for having to purchase as much and you’ll be diverting waste from the landfill and helping reduce greenhouse gas emissions in the process. Let’s dig in.
References and Resources:
Just Grow Something Gardening Friends Facebook Group
Check out how you can become a patron on Patreon
Bonus content for supporters of the Podcast! (buymeacoffee.com)
Ep. 80 - Creating and Managing a Compost Pile
Ep. 106 - Introduction to Vermicomposting (Worm Farming!)
Ep. 107 - Worm Farming with Lauren Cain of Elm Dirt
Hosted by Simplecast, an AdsWizz company. See pcm.adswizz.com for information about our collection and use of personal data for advertising.
00:00:00
As we start to wind down the summer gardening season, it's a
00:00:04
great time to be adding compost to your beds to help give the
00:00:07
soil a boost. Letting the compost breakdown
00:00:10
over the winter gives it adequate time to become
00:00:12
activated with all the little microorganisms that are so
00:00:14
important for delivering nutrients to our plants in the
00:00:17
soil. But purchasing compost,
00:00:20
especially really good compost, can be pricey.
00:00:23
And the bigger your garden, the higher the price tag.
00:00:26
It's hard to justify sometimes because some of us are growing
00:00:29
our own gardens so that we can save money on our food budget
00:00:33
and not pay more to amend the soil than it would cost us to
00:00:36
just buy our veggies at the grocery store.
00:00:38
And if we opt for the budget compost, we may find that not
00:00:43
only is the texture and the quality definitely fitting the
00:00:46
price point, but our plants aren't getting much out of that
00:00:49
soil the following season, which is a complete waste of money.
00:00:53
I also understand that not everybody has room for a big
00:00:58
compost pile in their yard. You may not even have a yard and
00:01:01
you're gardening in containers on a patio or a porch, but you
00:01:04
still want the best amendments for your soil.
00:01:07
And everybody has kitchen waste that can be used to feed our
00:01:12
garden soil. So today on Just Grow Something,
00:01:14
we're going to talk about the absolute easiest and least messy
00:01:18
ways to build a small compost pile or composting system for
00:01:24
your garden, regardless of where you are.
00:01:26
It may not be everything that you need to add to your garden,
00:01:29
depending on the size that you're working with, but it will
00:01:32
absolutely reduce the need for having to purchase as much and
00:01:37
you'll be diverting waste from the landfill and helping reduce
00:01:41
greenhouse gas emissions. The process.
00:01:44
Let's dig in. Hey, I'm Karen, I started
00:01:47
gardening in a small corner of my suburban backyard and now 18
00:01:50
years later, I've got a degree in horticulture and operate a 40
00:01:53
acre market farm. I believe there is power in food
00:01:57
and that everyone should know how to grow at least a little
00:01:59
bit of their own. On this podcast, I share
00:02:01
evidence based techniques to help you plant, grow, harvest
00:02:05
and store all your family's favorites.
00:02:07
Consider me your friend in the garden.
00:02:09
So grab your garden journal and a cup of coffee and get ready to
00:02:12
just grow something. So the September Question of the
00:02:24
Month asked, what was your biggest success in the garden
00:02:29
this season? So from the e-mail I got from
00:02:33
Zita, Swindell's said my biggest success in the garden this year
00:02:37
was summer squash. I planted Blue Hubbard squash as
00:02:40
a trap crop early on, planted a couple of other varieties a few
00:02:43
weeks later, then a third sewing when I had an open bed after
00:02:47
harvesting my garlic. For the first time ever I
00:02:51
avoided the dreaded squash borers that I'm always that are
00:02:54
always taking out my plants. And I followed up and I asked
00:02:58
Zita where they were gardening and they said I'm in zone 6A
00:03:02
just north of Chicago. My best guess is that I planted
00:03:06
out my Blue Hubbard seedlings in late June and planted my
00:03:10
additional sewings of varieties that I planned to eat in
00:03:13
mid-july and late July. When the Blue Hubbard started
00:03:17
taking over the entire garden and looked bad, I took it out.
00:03:21
So this is the exact way to accomplish trap cropping.
00:03:26
Plant something early on that the insect is more attracted to
00:03:30
and let it get going before your actual cash crop goes in, and
00:03:35
then use succession planting to keep the harvest going.
00:03:39
So bonus points here for Zeta because in that area of Chicago,
00:03:46
it's very likely that the squash vine borer moth is no longer
00:03:51
active after, you know, June or late July.
00:03:55
It used to be that way here also.
00:03:57
It used to be by like mid-july. If you could wait to plant your
00:04:01
zucchinis until after that, you at least were safe from the
00:04:04
squash vine bores because it seemed like their life cycle had
00:04:07
already ended by that time. But we're seeing that later and
00:04:11
later every year now. So I was talking to somebody
00:04:14
else, and they were saying, yeah, they waited like they
00:04:16
normally do, and they still lost all of their plants to squash
00:04:20
vine borer. And this was the end of July
00:04:22
when they planted. So things seem like they might
00:04:25
be shifting. So at least we know in the
00:04:26
Chicago area that that timing is going to work.
00:04:29
So that is fantastic. Also from the e-mail, Shelly
00:04:34
Orozco said, Hi Karen, you asked people to let you know what did
00:04:39
well in the garden this year, and I have to say that the Amish
00:04:42
paste tomatoes I purchased from you went crazy.
00:04:45
The plants were so big and heavy with tomatoes that some of the
00:04:49
branches broke and my tomato cages weren't able to hold them
00:04:53
up. Next year I'm going to put the
00:04:55
planters on the ground below my deck railing so I can tie them
00:04:59
off to the handrail. I also didn't have as much
00:05:02
trouble with blossom and rot as I did with the Roma tomatoes
00:05:05
last year. They're about done for the year,
00:05:08
but I still have tomatoes I'm waiting to ripen.
00:05:11
Besides what we've used I have had, I have about 8-1 gallon
00:05:15
bags of them in my freezer from only four plants.
00:05:19
I also purchased 2 San Marzano tomatoes from you and one of
00:05:22
them just started going crazy in the last couple of weeks so they
00:05:26
must mature slower. One plant didn't do as well even
00:05:30
though they're in the same pots in the same location.
00:05:35
Or maybe it's the self watering planters that I used for the
00:05:38
Amish ones versus regular pots for the San Marzanos.
00:05:41
So I'll try them in self watering planters next year
00:05:44
regardless. I've got so many tomatoes on
00:05:46
that San Marzano that it also bent my cage and one of the
00:05:50
branches broke. So my experience with Amish
00:05:54
paste versus San Marzano has been pretty much the same.
00:05:57
My Amish paste tomatoes usually completely overload my plants.
00:06:01
They come on in a really big flush and I end up with bags and
00:06:05
bags of tomatoes in the freezer. The San Marzanos for me seem to
00:06:09
come on a little bit more slowly for me.
00:06:10
They also don't seem to produce as much and they and the regular
00:06:14
Roma's do tend to have much more in the way of blossom and rot
00:06:19
issues than I've ever experienced in the paste.
00:06:22
The Amish paste don't ever seem to get blossom and rot.
00:06:25
All of This is why I absolutely always encourage a garden
00:06:29
journal, so that you can track which varieties do best for you
00:06:33
under which growing conditions, but also in relation to the
00:06:36
weather. My Amish paste actually didn't
00:06:39
do as well as Shelley's this year, and they're obviously the
00:06:41
same plants since I sold those starts to her.
00:06:44
But the problem for me was mine were hit with some late blight
00:06:48
from the sort of excessive rain that we had much earlier or much
00:06:51
later in the season than as usual, and the raccoons kept
00:06:54
getting to them before I could. So there's that problem.
00:06:58
From the Facebook group, Cody Ruth said what was my greatest
00:07:01
success in the garden this season.
00:07:03
I'm not sure if it counts for this season, but this year my
00:07:06
big win was garlic. I've got so much I can't
00:07:10
possibly use it all in a year, but I can give some away for
00:07:13
gifts and I'll have plenty to plant again for next year.
00:07:17
I haven't harvested my sweet potatoes yet, but if we're going
00:07:19
off of foliage alone as a way to measure success, then it may be
00:07:24
sweet potatoes. I don't think I caught the
00:07:26
question of the month, maybe the last couple of months, but did
00:07:29
you ask about greatest failures too?
00:07:31
Because I have a list of those as well.
00:07:33
It seems like when garlic is lackluster, it's just kind of
00:07:37
so. So it doesn't really ever seem
00:07:39
to be a total disaster unless nothing, just nothing grows.
00:07:42
But it can just kind of be ho hum sometimes.
00:07:45
But when it goes well, it goes big and it goes really well.
00:07:50
So it's great to not only have plenty for yourself and for
00:07:52
gifting, but also saving a really successful crop to plant
00:07:55
again is awesome. That's amazing.
00:07:58
As far as the foliage on the sweet potatoes, you know,
00:08:01
sometimes they're a little bit like carrots where you have all
00:08:04
these big tops and then there's like nothing underneath.
00:08:07
But in most instances when I've had a lot of really good foliage
00:08:11
going on with the sweet potatoes, there usually seems to
00:08:13
be a whole lot going on underneath.
00:08:16
And I tend to get really curious and I will just sort of dust
00:08:19
back the soil on those mounds a little bit just to kind of check
00:08:22
the progress on those sweet potatoes because I did make the
00:08:25
mistake take the first year, I think we grew sweet potatoes and
00:08:29
I left them in until basically the foliage just started to die
00:08:32
back. And those sweet potatoes were
00:08:35
massive. Like I had sweet potatoes that
00:08:38
were the size of my head. And so now we just sort of time
00:08:43
it. I wait until we're about 100 to
00:08:45
110 days out after planting. And then I sort of start to
00:08:49
check and see. And if I have a bunch of them
00:08:50
that are about the right size, then I start harvesting because
00:08:53
we don't want the giant ones. We like, you know, to be
00:08:56
weighing about a pound or so at the most, usually smaller than
00:09:00
that. And our customers, because we're
00:09:01
growing on a large scale, my customers tend to let them
00:09:03
smaller too, so we don't wait. So you might find that you have
00:09:08
some monsters under their Cody, so you might want to start
00:09:11
checking those soon. As far as the question of the
00:09:16
month, I hadn't done one most of the summer, so you haven't
00:09:19
missed any. But yes, garden failures is
00:09:22
coming up as a question. And in that same thread in the
00:09:25
Facebook page, Sharon Ipcock Price shared my greatest success
00:09:30
was keeping the squirrels and crows from pulling my corn up.
00:09:35
And she shared a beautiful picture of her stands of corn.
00:09:38
This is another good one. I mean, for us, it's usually
00:09:41
deer and raccoons getting the corn, and I've gone to all kinds
00:09:44
of crazy measures to keep them out.
00:09:46
Last season I wrapped the entire crop in bird netting because I
00:09:52
was growing my corn in the planter box, direct planters.
00:09:55
And so I just wrapped the entire planter and those corn plants.
00:09:58
It worked like a charm. Everybody stayed out.
00:10:00
In fact, I didn't have to grow corn this year because I had
00:10:02
enough in the freezer. So I'm glad you finally got
00:10:05
corn, Sharon. And also in that same thread,
00:10:08
Brittany McCormack said I definitely have more failures
00:10:12
this year than ever, but I had some unexpected successes.
00:10:16
Loofah and cucumbers are my successes.
00:10:20
So it sounds like your vining crops were the winner this year.
00:10:23
And as we'll find out here in a minute, those loofah are
00:10:27
actually edible. So if you're having problems
00:10:30
with zucchinis, keep that in mind.
00:10:33
And finally, Jacqueline Whitmore 3960 on the YouTube said my
00:10:39
biggest success was that I finally got a squash, my beast
00:10:43
of a cuckoozy plant. No, my beast of a plant of
00:10:47
cuckoozy squash is finally fruiting.
00:10:50
I picked my first one tonight. All my other late plantings of
00:10:53
squash are dealing with squash vine borer damage.
00:10:56
But the cuckoozy made it. So again, see, that's the timing
00:10:59
of those squash vine borers. So Jacqueline planted late ones.
00:11:04
Obviously they are dealing with squash by bore, but this
00:11:07
cuckoozy squash made it. Now these squash have gotten
00:11:10
really popular in the last year or two for this exact reason.
00:11:13
If you're not familiar with cuckoozy or cuckooza squash,
00:11:16
it's an heirloom Italian gourd that produces these long
00:11:21
cylindrical fruits. They're also known as snake
00:11:25
gourd or snake melon, which it's not a melon.
00:11:29
It's in the Legendaria plant family, which is all of the
00:11:33
gourds. So since it's a gourd, as the
00:11:36
fruit matures, that skin becomes really hard and tough and it's
00:11:39
no longer edible. And we generally use them for
00:11:42
decorations, for crafts and that sort of thing.
00:11:44
That's actually how I used them years ago.
00:11:46
I had some for decoration that I used to use for Halloween, but
00:11:50
if you harvest them, while they're immature, they are
00:11:53
smooth and they're like a pale green color and they are
00:11:56
absolutely edible. It's kind of reminiscent of the
00:11:59
texture and the taste of zucchini, but also with kind of
00:12:02
a subtle nutty flavor. Leaning a little bit more
00:12:05
towards like butternut squash maybe?
00:12:09
So this is also similar to what we see in loofah gourds.
00:12:13
Yes, we grow them to maturity and we use them for sponges, but
00:12:16
all of those little fruits in their immature stage can
00:12:19
absolutely also be eaten like zucchini.
00:12:23
The great thing about this Cacusa squash, it seems to be
00:12:26
that it's able to fend off the squash bugs and the vine borers
00:12:29
better than our traditional summer squashes.
00:12:31
Another one like this that's also gaining in popularity is
00:12:34
tromboncino squash. Now the difference with
00:12:37
tromboncino is that it's actually a true squash.
00:12:40
It's in the curcubit family and it can be harvested and eaten at
00:12:44
just about any size. And these suckers can get to be
00:12:46
like 3 foot long and you can still eat them at that stage.
00:12:50
So unlike the ones that are in the gourd family, when they
00:12:53
start to get that big, that's when they start to get hard and
00:12:55
inedible. But you can continue to eat the
00:12:57
tromboncino all the way up until that size.
00:13:00
And it too also seems to do really well against the squash
00:13:04
nemesis. So in fact, I have heard so many
00:13:07
good things about both of these that I am including them in my
00:13:11
garden plan next year. You just have to have a good
00:13:14
place to grow them, preferably on a trellis, especially those
00:13:18
cacusa because those vines can get to be like 30 feet long.
00:13:23
So again, think of them in terms of our loofah squash and how
00:13:25
long those vines get. But that vine is going to keep
00:13:28
producing squash the whole season up to frost, so it is
00:13:31
something to consider. My biggest success in the garden
00:13:36
this year was an absolute surprise for me, and that was
00:13:39
Brussels sprouts. I have tried so many years to
00:13:43
grow Brussels and without fail they either didn't produce a
00:13:47
darn thing or they got eaten by something or they just didn't
00:13:50
survive very well. And so this year I either got
00:13:55
the timing right on the planting or the way we sort of actually
00:14:00
eased into spring. This season was slow enough that
00:14:04
the sprouts actually had time to produce something.
00:14:07
I'm actually still picking sprouts off of the original
00:14:11
plants from spring. They went dormant during the hot
00:14:14
summer months and then they just sort of picked up growing where
00:14:17
they left off. So I didn't even need to plant
00:14:19
anything for fall. I'm, I'm super excited to try
00:14:21
them again next spring now that I have some notes to work off of
00:14:25
from a successful season. So as I alluded to a minute ago,
00:14:30
the question of the month for October is what was your biggest
00:14:35
failure in the garden this year? Now, just because things fail in
00:14:39
the garden doesn't mean that we aren't good gardeners, OK?
00:14:41
I've had several garden consulting clients this season
00:14:44
who were on track to do really well for like their second or
00:14:48
third year gardening, but they all had one problem or another
00:14:52
come up in crops that they previously were were really
00:14:54
successful with. And I've had to remind them the
00:14:58
weather was very different this year than it was in the past two
00:15:01
years, and every season may be different.
00:15:04
That's why garden journals and notes can be so helpful.
00:15:07
Not only does it provide us with valuable information to produce
00:15:11
better crops in the garden, but it also gives us insights into
00:15:15
why something may not have gone the way that we expected.
00:15:18
It's not always something that we have done incorrectly.
00:15:22
So what was your biggest failure in the garden this year?
00:15:25
Let me know in the comments on YouTube or in Spotify.
00:15:28
Even post in the Facebook group or send me an e-mail or Adm.
00:15:31
You have until October 31st to get me your answer.
00:15:36
So let's talk about some composting systems that don't
00:15:39
rely on a big outdoor pile to do the work.
00:15:43
Some of these are available for purchase, Other ones can
00:15:45
actually just be DIY projects. And the first one is Bokashi
00:15:50
composting. So you can do this in indoor
00:15:53
spaces or very small spaces. You can do it in an apartment.
00:15:56
So Bakashi is an anaerobic composting method, so it means
00:16:01
without oxygen. If you have listened to any of
00:16:04
the composting episodes from before, you know we talk a lot
00:16:06
about the need for oxygen in composting systems in order to
00:16:11
help break things down. Bakashi is an anaerobic system,
00:16:15
so no oxygen and essentially you are fermenting the food scraps
00:16:20
and this includes meat and dairy and you are using an inoculated
00:16:24
bran or sawdust. So you put the food waste into a
00:16:29
sealed bucket, you layer it with this inoculated bran and then
00:16:34
you seal it up. And then after a few weeks the
00:16:37
material is basically it's fermented, they call it sort of
00:16:41
pre composted. And so at that point you can
00:16:44
take it out and you can put it directly into your planters or
00:16:48
into your garden beds or into the soil or whatever.
00:16:50
So it can finish decomposing. So it's kind of a a jump start
00:16:55
to the natural composting process that gets finished once
00:16:58
it gets put out into your garden.
00:17:00
But because it's anaerobic, it's in a sealed system, so it's you.
00:17:05
It's more of a fermentation, I think than anything else.
00:17:08
This isn't something that you're really going to do DIY other
00:17:11
than purchasing the Bakashi brand separately.
00:17:15
So you can buy starter kits that include the buckets and the
00:17:18
brand and all kinds of stuff there.
00:17:19
You can find them online. You can usually find them in
00:17:21
gardening stores too. If you want to do a DIY version,
00:17:24
then you can just make your own bin and you just need an
00:17:27
airtight container to do that. And then you purchase the
00:17:31
inoculated brand separately. Your second option is something
00:17:37
that's becoming a little bit more and more popular.
00:17:39
And these are electric composters or sort of food
00:17:43
recycler machines. I'm not really sure I would call
00:17:46
them composting. These are great for apartments
00:17:49
again, or if you have very limited space or you're, you
00:17:54
know, HOA doesn't allow for a compost bin outside or you just
00:17:56
don't want a compost bin outside.
00:17:59
These are things like the Loamy or the Vitamix food cycler.
00:18:04
Essentially, it's going to grind up all of your food waste and
00:18:07
then it's going to, you know, kind of cook it under some
00:18:10
really high heat and then it's going to dehydrate it.
00:18:13
And this whole process happens in about a matter of hours.
00:18:17
So you can reduce that food waste by up to 90% in volume
00:18:22
within just a few hours. So if you just Add all your
00:18:24
stuff to this thing during the day and you set it to run at
00:18:27
night, like tomorrow, you're going to have this dry soil like
00:18:33
material. I'm not going to say that it's
00:18:35
soil. It's more akin to maybe worm
00:18:37
castings, but it is a soil amendment.
00:18:41
So not only have you, you know, kept your food waste from going
00:18:45
into the, the local, your local waste, you know, collection
00:18:51
center or whatever your, your landfill, you're also creating
00:18:55
your own amendments for your soil in your garden.
00:18:58
And you can put it into your containers and your pots.
00:19:00
And it's not stinky, it's not smelly, it's not wet when it
00:19:04
comes out, it is very dry, can be used right away.
00:19:07
The problem with these machines, at least at this stage of the
00:19:10
game, they are still very expensive.
00:19:12
They have come down in price a little bit and there are
00:19:17
varieties or options out there that can handle a wide variety
00:19:21
of food scraps, including bones and dairy, which again, are
00:19:24
things that we don't normally put into our normal compost
00:19:26
piles. So there are some, you know,
00:19:28
some really good options for these things.
00:19:31
You just have to be willing to spend the money on them.
00:19:32
They can be fairly expensive. So one other way that you can
00:19:38
you can compost without actually having a compost pile is
00:19:42
composting in place. This is either trench or pit
00:19:45
composting or in garden composting if you have a garden.
00:19:50
I don't recommend this for small like pots, but if you have
00:19:55
raised planters, larger raised planters or an in ground garden.
00:19:59
But even if it's just a very small space, that's fine.
00:20:02
You are actually taking your food waste and you are directly
00:20:05
burying it into the soil, allowing it to decompose
00:20:09
naturally underground. This is the way composting
00:20:13
naturally works. All you're basically doing
00:20:15
though is digging a trench or a pit within the garden.
00:20:19
About 12 or 1818 inches deep is fine, and then you just add your
00:20:23
food scraps and then you cover it with soil.
00:20:26
So over time the microorganisms are going to break down that
00:20:28
waste and it's going to enrich the soil in that spot.
00:20:31
It's super easy. You just need a shovel and some
00:20:33
soil. So you don't need anything
00:20:35
special, any special tools, You don't have to have buckets
00:20:37
outside, none of that stuff. The only drawback to this is if
00:20:41
you live in an area where you have pretty persistent critters,
00:20:46
I guess would be the way to to say it, that tend to seek out
00:20:50
food scraps. You need to make sure it's
00:20:52
buried well underneath. And it's not going to, you know,
00:20:56
send up any foul odors that are going to attract any of those
00:20:59
critters or that are going to, you know, cause you to have some
00:21:03
issues with, you know, some smells or anything in your
00:21:05
backyard. So just make sure that it's
00:21:07
buried really well. But I tend to do this in the
00:21:11
offseason. So if I have food scraps and
00:21:13
stuff that need to go, my compost pile is pretty well
00:21:16
already set for the season. It's, you know, it's sitting out
00:21:18
there doing its thing, It's breaking down.
00:21:21
But if I have extra stuff that needs to go out there, I will
00:21:24
just toss stuff into my raised beds and just kind of mix it in,
00:21:28
you know, and, and not worry about it.
00:21:30
And by the time it times comes time to plant in the spring,
00:21:33
that stuff's already broken down.
00:21:34
It's not going to cause you any problems whatsoever.
00:21:36
It's perfectly fine. This also happens sometimes too,
00:21:39
when you do have a full size compost pile and maybe you're
00:21:44
ready to use it. You're ready to amend your beds
00:21:46
in the spring and your compost isn't quite completely broken
00:21:50
down. That's OK.
00:21:52
As long as they're not huge chunks of things, you can still
00:21:55
go ahead and throw those into your raise planters or into your
00:21:58
garden beds and it's going to continue to break down.
00:22:01
As long as it's not getting in your way with planting your
00:22:04
plants or your seeds and it's not attracting any pests, then
00:22:08
that's not a problem at all. The fourth way that you can
00:22:11
compost without having an outdoor huge system is what they
00:22:14
kind of call blender composting or maybe a food scrap smoothie.
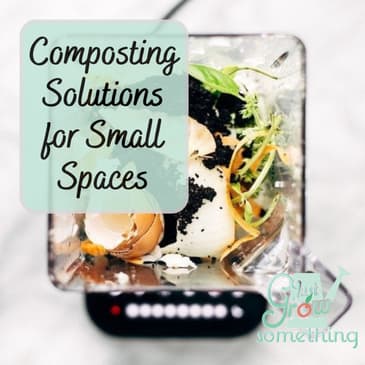
00:22:20
It's exactly what it sounds like.
00:22:21
You know, you're taking a, you want a high-powered blender.
00:22:24
You want like a Ninja or a Vitamix or something that's like
00:22:27
at least I think 1500 watts or more to really be able to do
00:22:31
this. But all you're doing is you are
00:22:32
blending your food scraps into a smoothie, a slurry.
00:22:38
You know, if you add to have to add some liquid to it, fine,
00:22:40
great. And then you can just literally
00:22:42
pour that into your garden beds. If it's not super stenchy, then
00:22:50
you can just leave it on top, Just pour it around the plants
00:22:52
and it's going to wake work its way in.
00:22:54
But if you've got some stuff in there that might get a little
00:22:57
stinky or rancy rancid, then you can just pull the soil to the
00:23:00
side and just kind of pour it in and break it down.
00:23:02
This is absolutely going to accelerate the decomp because
00:23:06
the food's already broken down into smaller particles, so it's
00:23:09
going to immediately start to compost out there.
00:23:12
And you can just use a regular old kitchen blender.
00:23:14
Now, be careful of what you're throwing in there.
00:23:16
You don't want to put any bones in there.
00:23:17
You don't want any like avocado pits or any really fibrous
00:23:20
material that's going to damage the blades on your blender.
00:23:23
But this works, especially if you don't usually have a ton of
00:23:27
food waste just blending them up in the into the blender and
00:23:30
doing this. And if you find that you don't
00:23:33
have a whole lot to compost all at once, you're a single
00:23:36
individual, you know, living by yourself or, you know, whatever
00:23:40
the case may be. A trick that I've seen my mom do
00:23:43
is actually, as you have scraps that would need to go into your
00:23:48
compost pile, you can just put them in a bag in the freezer
00:23:52
until you build up enough of it to be able to do something like
00:23:55
a food crap scrap, a food crap, No, a food scrap smoothie, you
00:24:00
know, or something else. In terms of your compost.
00:24:03
If, if you just have little bits at a time, that's OK.
00:24:05
Throw it in the freezer. Just keep adding to that bag
00:24:07
until the bag is full and then do something with it.
00:24:10
So, you know, there's, there's always a way to get rid of your
00:24:12
food waste without letting it go into the actual garbage and go
00:24:16
into a landfill because that is a really big problem.
00:24:19
The fifth way that you can kind of build a simple compost system
00:24:25
is by making a compost bucket. Now this one you are going to
00:24:29
need to do, you know, outside. But if you have a small space,
00:24:34
you don't need much space. You really only need a 5 gallon
00:24:36
bucket or a 20 liter bucket, I think is standard.
00:24:39
If you're outside the US, all you need to do is drill some
00:24:42
holes about 1/4 inch size and diameter is fine.
00:24:45
You want them all in the sides and in the bottom, sort of more
00:24:48
at the top and fewer at the bottom, if that makes sense.
00:24:51
And then at the bottom of that 5 gallon bucket, you want to line
00:24:55
it with some sticks or some dowels or something to kind of
00:24:57
prevent the compost from blocking the holes.
00:25:00
And then you just start with a layer of whatever your brown
00:25:04
material is, so newspapers or dried leaves, and then just
00:25:07
layer in your compostables in the same manner that you would
00:25:10
for a compost pile, preferably alternating those greens and
00:25:13
those Browns. So the best ratio to keep any
00:25:16
funky smells from coming on is like 3 parts brown to one part
00:25:20
green. If you put too much green
00:25:21
material in there at once and it's going to become kind of
00:25:24
icky and slimy, just like it would in a regular outside
00:25:26
compost pile. So just be cognizant of that.
00:25:30
But once the bucket is about 3/4 of the way full, then you can
00:25:33
just put a really tight lid on it and just roll it around a
00:25:35
little bit on its side to mix everything up.
00:25:38
And then just stick it in a sunny spot outside somewhere and
00:25:41
just give it a roll once a week when you remember, that's it.
00:25:45
The contents of that bucket are going to be pretty much broken
00:25:48
down completely in about 6 to 8 weeks.
00:25:50
And you are it's ready to throw into your garden without any
00:25:53
kind of smell or anything else. You can have multiple buckets
00:25:56
going if you fill them up very quickly and just tuck them out
00:25:59
of the way somewhere. I say put them in the sun.
00:26:01
You can put them in the shade if you want to, but they're going
00:26:03
to break down faster if they've got that heat going on.
00:26:06
If you can place the bucket in the corner of the garden or at
00:26:11
least somewhere with soil underneath, that's actually
00:26:14
going to be the best because you've got those holes in the
00:26:16
bottom. It's going to release leachate,
00:26:19
which is this brown liquid that sort of seeps off of the
00:26:22
compost. If you have it on, you know, a
00:26:24
brick or a patio area, it's going to leak out and it's going
00:26:27
to make kind of a mess. But if you leave it on the soil,
00:26:29
it's naturally going to seep away.
00:26:31
So it's feeding that soil anyway.
00:26:33
And at that point, it might even attract a few worms that will
00:26:37
get in there and help to aerate the bucket even more.
00:26:42
So Speaking of worms, one method we didn't touch on that you
00:26:46
absolutely can do in a small space and even inside of your
00:26:49
house is Verma composting. So I did a series of episodes on
00:26:53
this last season, I believe. I will link to the main episode
00:26:58
and my interview with Lauren Kane of Elm Dirt all about how
00:27:01
to set up your own worm bins so that you can get worm castings
00:27:06
while also composting your kitchen scraps.
00:27:09
All of these methods that we talked about are pretty
00:27:12
flexible, fairly easy ways to compost your food waste without
00:27:16
actually having a traditional compost pile.
00:27:18
So depending on your space and your time and your level of
00:27:21
effort, there is absolutely an option for everybody.
00:27:26
Until next time, my gardening friends, keep on cultivating
00:27:28
that dream garden, and we'll talk again soon.
00:27:30
Thanks for listening to another episode of the Just Grow
00:27:32
Something podcast. For more information about
00:27:35
today's topic and to find all the ways you can get in touch
00:27:37
with me or support the show, go to justgrowsomethingpodcast.com.
00:27:42
Until next time, my gardening friends, keep learning and keep
00:27:45
growing.